June 3rd, 2020
Upcycling Hair Extensions: The DIY Donut Bun
Have you ever wondered what to do with your old set of Cashmere Hair extensions? Like anything made from real hair, our extensions do have a shelf life (though treating them well can extend it - check out this article for tips!). And while we recommend replacing your set when they're starting to look worn, that doesn't mean you need to throw them away.
In this new blog series, we'll explore different ways to recycle hair extensions, and we're starting with a classic: the DIY Donut Bun. Keep on reading for how to give your old extensions new life!
DIY Donut Bun Tutorial
Typically, a hair donut is made from foam, and semi-matches the color of your hair (think blonde, brown, or black. Not a ton of options). And for you thin-haired ladies, it can be difficult to cover all that foam with your natural hair... but never fear. I've got a solution for you.
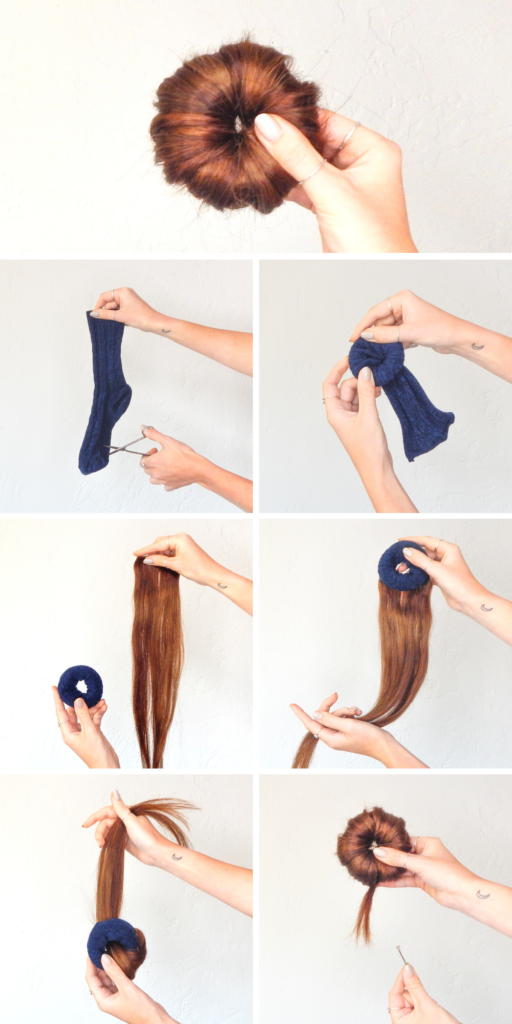
This DIY donut bun perfectly matches your hair, and doesn't need to be covered up -because it's made from old extensions! In the next few steps, I share all the steps necessary to upcycle your extension set into a gorgeous new hair accessory.
First things first are the materials. For this tutorial, you'll need the following:
- (x3) 3" wefts from our Classic or Seamless Hair Extension Set
- an old (clean!) sock
- pair of scissors
- bobby pins
Gathered all the supplies for your DIY donut bun? Great! Let's get started.
1. Prepare Your Sock
This is a great use for that sock whose mate got eaten by the dryer (I can't be the only one with six singles floating around my drawer!). Take your sock and use the scissors to carefully snip the toe off. It should now resemble something like a tube.
2. Assemble the Base
Begin to roll your sock from the cut end, being careful to keep the roll as tight as possible. This is because the tighter your roll, the easier it will be to hide the sock with your old extensions. When you're finished, you should have something shaped like a donut - this is the key to your DIY donut bun.
Note: make sure the edge of the sock is toward the top of the donut - this will make the next step a lot easier.
2. Attach Your Extensions
Next, it's time to use those hair extensions! Pick up the first of your 3" wefts, making sure they're clean and detangled. If you need instructions on how to clean them, this post can help.
Pop open the clips, and clip the weft to the edge of the sock. Be sure it's fastened securely, and that the sock isn't coming un-rolled.
3. Wrap
Pull your extensions through the center, wrapping them around the donut to cover the weft and sock. Keep wrapping until you reach the end of your hair. After that, grab a bobby pin and secure the ends. It may take some finessing to get this right the first time - don't be afraid to unwrap and start over!
4. Complete Your Donut Bun
Again, take your second and third wefts, attach, wrap, and pin. At the end, you should have a full piece that looks just like a ballerina bun! It's an easy and essential accessory to have on hand for styles like messy buns and updos.

How to Style
Now that you have your perfectly color-matched DIY donut bun, you might be wondering - what now? Next, I'll walk you through how to style your fab new hair accessory.
1. Make A Ponytail
Using a wide tooth comb or brush, pull your hair into a tight, secure ponytail. I like mine super-high for maximum impact, but the choice is yours! Just make sure it's secure and not wobbling around.
2. Add Your DIY Donut Bun
Then, grab your ponytail in one hand and donut bun in the other. Pull your pony through the center of the bun, so that it rests on the top of your head over the hair-tie.
3. Style Away!
This step is pretty open-ended. In the video, I style my hair in a simple, chunky messy bun (I'm still working from home, after all). But there are so many different things you can do with a DIY donut bun - from a sleek ballerina style, to a fancy updo, your options are honestly limitless.
If you want to shop my look for this tutorial, I used my 18" Hollywood Brunette Classic Extensions (custom-dyed to my finicky shade of red). I'll link them here:
I hope you enjoyed this tutorial, and that it helps you make use of some of your old extensions! If you have any more ideas on how to upcycle your old wefts, or you tried this tutorial and want to share, let me know in the comments. I'm so excited to share more from this series with you, and can't wait to hear what you all think.
Happy DIY'ing!
Want to connect more? Katie can be found over on Instagram at @kmartello - don't be afraid to say hi!
